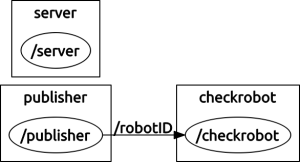
[ROS] [笔记(3)] 第三个例子:Hello & Check Robot(launch文件)
本教程将把前面两个例子综合,同时包含基本的 launch 启动文件。
0、Hello & Check Robot 的场景:
我们想要完成这样一个场景:
1)有一系列 robot 排成一排(publisher)向管理员(subscriber)报道,每个人都发一个消息(robotID),包含 name 和 id 类似:
name=robot id=0

name=robot id=1

name=robot id=2
2)有一个管理员订阅了这个消息(robotID),然后读取消息内容并且和每个机器人打招呼:
Hello Robot 0

Hello Robot 1

Hello Robot 2
3)因为机器人有好有坏,因此有一个服务 checkRobotSrv ,这一服务就是你告诉它 Robot 的 name 和 id 它会告诉你这个 robot 是好是坏。
4)该管理员调用 checkRobotSrv 服务来检查 Robot 是好(Good Robot)还是坏(Bad Robot)并且输出。
可以看到上面的1)和2)都是我们在 Hello Robot 教程 里面完成的工作。
要完成以上的功能,我们需要创建消息(robotID)、发送消息的发送者(publisher)、接收消息的订阅者(subscriber),这些工作我们在 Hello Robot 中已经完成了。为了实现 check robot 服务,我们还需要创建服务(checkRobotSrv)、服务器(server)、客户端(client)。
可以看出这一场景是前面两个教程 例子:Hello Robot 和 例子:Check Robot 场景的综合。
1、新建 checkrobot.cpp:
为了简单,我们直接在 checkrobot 的 package 里面添加 checkrobot.cpp 源码,目录 ROS_PTAH/hellorobot_ws/src/checkrobot/src。
源码内容如下:
1 2 3 4 5 6 7 8 9 10 11 12 13 14 15 16 17 18 19 20 21 22 23 24 25 26 27 28 29 30 31 32 33 34 35 36 37 38 39 40 41 42 43 44 45 46 47 48 49 50 51 52 53 54 55 56 57 58 59 60 61 62 63 64 65 66 67 68 69 70 71 72 73 74 | #include "ros/ros.h" //#include "std_msgs/String.h" #include "hellorobot/robotMsg.h" #include "checkrobot/checkRobotSrv.h" /** * This tutorial demonstrates simple receipt of messages over the ROS system. */ void checkRobotCallback(const hellorobot::robotMsg::ConstPtr& msg) { ROS_INFO("I heard: [%s %d]", msg->name.c_str(), msg->id); ros::NodeHandle n; ros::ServiceClient client = n.serviceClient<checkrobot::checkRobotSrv>("checkRobot"); checkrobot::checkRobotSrv srv; srv.request.id = msg->id; if (client.call(srv)) { ROS_INFO("Result: %s", srv.response.result.c_str()); } else { ROS_ERROR("Failed to call service checkRobot"); return; } } int main(int argc, char **argv) { /** * The ros::init() function needs to see argc and argv so that it can perform * any ROS arguments and name remapping that were provided at the command line. * For programmatic remappings you can use a different version of init() which takes * remappings directly, but for most command-line programs, passing argc and argv is * the easiest way to do it. The third argument to init() is the name of the node. * * You must call one of the versions of ros::init() before using any other * part of the ROS system. */ ros::init(argc, argv, "checkrobot"); /** * NodeHandle is the main access point to communications with the ROS system. * The first NodeHandle constructed will fully initialize this node, and the last * NodeHandle destructed will close down the node. */ ros::NodeHandle n; /** * The subscribe() call is how you tell ROS that you want to receive messages * on a given topic. This invokes a call to the ROS * master node, which keeps a registry of who is publishing and who * is subscribing. Messages are passed to a callback function, here * called chatterCallback. subscribe() returns a Subscriber object that you * must hold on to until you want to unsubscribe. When all copies of the Subscriber * object go out of scope, this callback will automatically be unsubscribed from * this topic. * * The second parameter to the subscribe() function is the size of the message * queue. If messages are arriving faster than they are being processed, this * is the number of messages that will be buffered up before beginning to throw * away the oldest ones. */ ros::Subscriber sub = n.subscribe("robotID", 1000, checkRobotCallback); /** * ros::spin() will enter a loop, pumping callbacks. With this version, all * callbacks will be called from within this thread (the main one). ros::spin() * will exit when Ctrl-C is pressed, or the node is shutdown by the master. */ ros::spin(); return 0; } |
其中我们只是把原来 subscriber 中的 checkRobotCallback 修改成使用 checkRobotSrv 服务:
1 2 3 4 5 6 7 8 9 10 11 12 13 14 15 16 17 18 | void checkRobotCallback(const hellorobot::robotMsg::ConstPtr& msg) { ROS_INFO("I heard: [%s %d]", msg->name.c_str(), msg->id); ros::NodeHandle n; ros::ServiceClient client = n.serviceClient<checkrobot::checkRobotSrv>("checkRobot"); checkrobot::checkRobotSrv srv; srv.request.id = msg->id; if (client.call(srv)) { ROS_INFO("Result: %s", srv.response.result.c_str()); } else { ROS_ERROR("Failed to call service checkRobot"); return; } } |
这样这个 checkrobot 的 node 就完成了。
2、编译:
1)修改 CMakeList.txt 添加 Server 和 Client 编译项:
在 CMakeList.txt 文件结尾添加如下几行:
1 2 3 | add_executable(checkrobot src/checkrobot.cpp) target_link_libraries(checkrobot ${catkin_LIBRARIES}) add_dependencies(checkrobot checkrobot_gencpp) |
2)运行编译命令:
在 ROS_PTAH/hellorobot_ws/ 目录下运行 catkin 编译:
1 | catkin_make |
如果没有问题整个工程就编译完成了。
3、运行测试:
1)首先运行 roscore:
1 | roscore |
2)其次进入 workspace 目录配置环境:
1 2 | cd ROS_PTAH/hellorobot_ws source ./devel/setup.bash |
3)运行 Publisher :
1 | rosrun hellorobot publisher |
4)新开一个 Terminal (Ctrl+Alt+T)运行 Server:
首先重复步骤2)配置环境。然后运行:
1 | rosrun checkrobot server |
5)新开一个 Terminal (Ctrl+Alt+T)运行 checkrobot,这是我们的主要执行程序:
首先重复步骤2)配置环境。然后运行:
1 | rosrun checkrobot checkrobot |
然后我们可以看到如下输出:
1 2 3 4 5 6 7 8 9 10 11 12 13 | [ INFO] [1446701281.108733878]: I heard: [Robot 4] [ INFO] [1446701281.110339206]: Result: Good robot [ INFO] [1446701281.208784947]: I heard: [Robot 5] [ INFO] [1446701281.211062463]: Result: Bad robot [ INFO] [1446701281.308627208]: I heard: [Robot 6] [ INFO] [1446701281.310114470]: Result: Good robot [ INFO] [1446701281.408624588]: I heard: [Robot 7] [ INFO] [1446701281.410047270]: Result: Good robot [ INFO] [1446701281.508692005]: I heard: [Robot 8] [ INFO] [1446701281.510126681]: Result: Good robot [ INFO] [1446701281.608701965]: I heard: [Robot 9] [ INFO] [1446701281.610149900]: Result: Good robot [ INFO] [1446701281.708806513]: I heard: [Robot 10] |
如果你的也是这样,那么恭喜你这个包含三个 nodes 的 package 就工作正常了。
4、使用 launch 进行启动:
如果每次都使用 3 中的方式一个一个节点启动显然很崩溃,有没有办法一次性启动好所有的 nodes 呢?ROS 给我们提供了一个专门的启动文件来做这样的设置。
1)创建启动文件:
在 ROS_PTAH/hellorobot_ws/src/checkrobot/ 下面新建 launch 文件夹和 checkrobot.launch 启动文件:
1 2 3 | mkdir launch cd launch vi checkrobot.launch |
2)将以下内容写入 checkrobot.launch 启动文件并保存:
1 2 3 4 5 6 7 8 9 10 11 12 13 14 15 | <?xml version="1.0" ?> <launch> <param name="name" value="Hello Robot" /> <node pkg="hellorobot" type="publisher" name="publisher" output="log" > </node> <node pkg="checkrobot" type="server" name="server" output="log" > </node> <node pkg="checkrobot" type="checkrobot" name="checkrobot" output="screen" > </node> </launch> |
其中关键的只有几行:
1 | <param name="name" value="Hello Robot" /> |
这里我们设置一个参数 name 其数值为 Hello Robot ,这个目前我们还没有用到,但是程序里面可以用这些来读取一些设置项。
1 2 | <node pkg="hellorobot" type="publisher" name="publisher" output="log" > </node> |
这是我们要启动的 node。
参数 pkg 是 node 所在的 package 名字;
参数 type 是 node 的可执行文件名;
参数 name 是我们 node 的名字。
参数 output 是表示 node 的输出显示到哪里,通常有 log 和 screen 两个选项,我们这里把 publisher 和 server 这样不需要输出的节点放入 log,把 checkrobot 这样的主节点显示在 screen。
3)启动 launch:
使用 launch 文件启动很简单,首先依然进入 workspace 目录配置环境:
1 2 | cd ROS_PTAH/hellorobot_ws source ./devel/setup.bash |
然后直接使用 roslaunch 命令运行即可,roslaunch 命令第一个参数是 package 名字,第二个参数是 launch 文件的名字:
1 | roslaunch checkrobot checkrobot.launch |
这样一下子就可以把所有节点启动了,是不是很简单呢?
源码下载:
hellocheckrobot
