Using VS Code, Continue, and Ollama + Qwen2.5-Coder on Mac to set up a free local AI programming assistant
最近 Cursor 这款编程神器如火如荼,吸引了众多开发者的目光。然而,尽管 Cursor 功能强大,其高昂的价格却让许多个人开发者和小型团队望而却步;同时,类似 Cursor 的工具,都是基于云端大模型的,很多对于隐私比较看重的希望更多使用本地大模型的方案。基于上述原因,本文将为 Mac 用户(需要你的电脑配置较高最好是 M 系列芯片才更好)介绍一种基于 VS Code、Continue 插件和 Ollama Qwen2.5-Coder 的本地化开源解决方案,让您以更低的成本体验 AI 编程助手的强大功能。
系统环境
macOS Sonoma 14.6.1
VSCode 1.93.1
Continue 0.8.52
Ollama 0.3.11
1. VS Code 下载&配置
![]()
VS Code 简介
Visual Studio Code 是一款轻量级但功能强大的源代码编辑器,可在您的桌面上运行,并支持 Windows、macOS 和 Linux 系统。它内置了对 JavaScript、TypeScript 和 Node.js 的支持,并拥有丰富的扩展生态系统,可以支持其他语言和运行时环境(如 C++、C#、Java、Python、PHP、Go、.NET)。
VS Code 可以从其官方网站下载[3]。
下载地址:
https://code.visualstudio.com/
VS Code+CLang 环境配置
我这里使用 C++ 进行演示,按照下面的官网教程配置了 VSCode+CLang 环境:
https://code.visualstudio.com/docs/cpp/config-clang-mac

比如我这里就安装了 C/C++ Extension Pack 这个套装就把 C++ 相关的插件都安装好了。
安装和配置教程参考:
https://marketplace.visualstudio.com/items?itemName=ms-vscode.cpptools-extension-pack
当然你也可以配置任何你需要的语言环境,这些不是本文重点,这里就不赘述了。
2. Ollama + Qwen2.5 Coder 下载&配置
2.1 Ollama 简介
Ollama 是一个开源项目,旨在简化大型语言模型的本地部署和使用[4]。它的主要特点包括:
- 支持多种流行的开源 AI 模型,如 Llama 2、CodeLlama 和 Qwen。
- 提供简单的命令行界面,方便模型的下载、运行和管理。
- 支持自定义模型和参数调整,以满足特定需求。
- 优化了本地运行性能,可以在个人电脑上流畅运行大型语言模型。
- 提供 API 接口,便于与其他应用程序集成。
介绍网站:
https://ollama.com/
2.2 Qwen2.5-Coder 简介

Qwen2.5-Coder 是通义千问团队开发的先进 AI 编程助手,提供 1.5B、7B 和即将推出的 32B 三种规模模型。它支持 128K tokens 上下文长度和 92 种编程语言,通过 5.5T tokens 的大规模训练数据显著提升了代码生成、推理和修复能力。7B 版本在多项评估中超越了更大规模模型,成为当前最强大的基础代码模型之一。Qwen2.5-Coder 不仅在编程方面表现出色,还保持了优秀的数学和通用能力。通过指令微调的 Qwen2.5-Coder-Instruct 版本进一步增强了多语言编程和复杂指令遵循能力。采用 Apache 2.0 许可,旨在加速代码智能领域的应用和创新。[1]
这一模型就是我们希望本地运行的模型,本篇文章中我们后面会使用 Qwen2.5-Coder-Instruct 来做实例。
模型介绍页面:
https://qwenlm.github.io/blog/qwen2.5-coder/
从介绍中我们可以看到其表现比大部分开源模型更好:

你也可以直接在 Hugging Face 进行简单体验:
https://huggingface.co/spaces/Qwen/Qwen2.5-Coder-7B-Instruct
2.3 Ollama 下载安装
对于 Ollama,Mac 用户可以访问官网下载安装:
https://ollama.com/

双击解压后的 Qllama.app 按照步骤一步一步安装 ollama 命令行工具:
2.4 配置 Ollama 和 Qwen2.5-Coder-Instruct 等模型
Chat 功能模型:Qwen2.5-Coder-Instruct 7B
该模型参见如下页面:
https://ollama.com/library/qwen2.5-coder
打开终端,运行以下命令下载 Qwen2.5-Coder-Instruct 7B 和 1.5B 模型,本篇文章发布时只有 7B 模型选择,更强大的模型还没有开放,后续也可以更换:
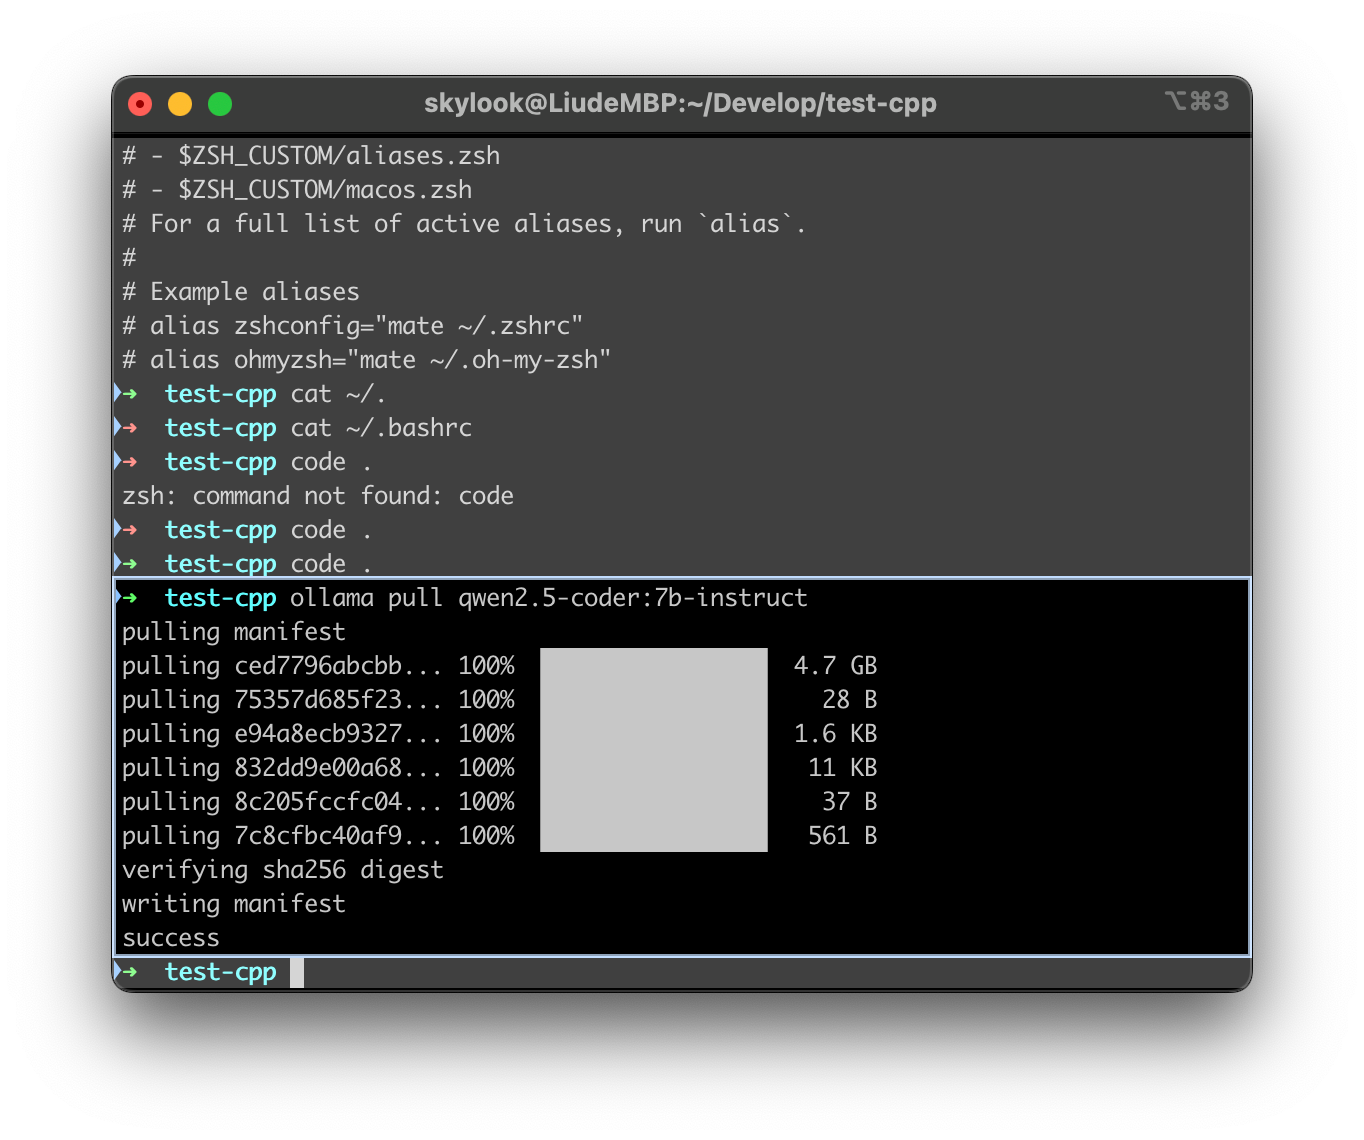
首先,下载一个 7B 模型,用于 Chat 窗口的指令对话,这一模型相对会慢一些,但是相比几十上百B的模型,本地电脑大多还能跑得动:
ollama pull qwen2.5-coder:7b-instruct
然后就是下载一个 4.7G 的文件,需要一段时间,如果成功的话就是类似如下界面:
Autocomplete 功能模型:StarCode2 3B
对于 Autocomplete,官方推荐的是 StarCode2 3B,实测下来这个模型更大所以会慢一点,但是效果的确好一些。如果电脑配置比较好的也可以安装这个:
网址:https://ollama.com/library/starcoder2
拉取模型:
ollama pull starcoder2:3b
如果这个跑不动的话,可以用更小的模型 DeepSeek Coder 1.3B:
ollama pull deepseek-coder:1.3b-base
总之,由于 Autocomplete 需要更频繁和快速的运行,但并不像 Chat 那样需要处理复杂的输入,从效果或者功耗考虑,最好的就是用专用的小而快的模型。
Embedding 功能模型:Nomic Embed Text
对于 Embedding 功能,官方推荐为 Nomic Embed Text 模型,这一模型很小:
网址:https://ollama.com/library/nomic-embed-text
拉取模型:
ollama pull nomic-embed-text
如果需要关闭 Qllama 进程可以使用下面的命令:
pkill ollama
2.5 配置 OpenWebUI 测试 Ollama 模型(可选)
当然你也可以配置一个类似 OpenAI ChatGPT 的聊天页面,可以自动切换这些模型来进行测试。OpenWebUI 就是一个 Ollama 官方支持的 Web 应用,安装方法建议使用 Docker 安装方式:
docker run -d -p 3000:8080 --add-host=host.docker.internal:host-gateway -v open-webui:/app/backend/data --name open-webui --restart always ghcr.io/open-webui/open-webui:main
然后打开网页:http://localhost:3000/ 即可使用
演示功能:
![]()
3. Continue 插件安装&配置
Ollama 和 Qwen2.5 Coder 模型安装完成后,在 VS Code 中安装 Continue 插件。打开 VS Code,使用快捷键 Cmd+Shift+X 进入扩展市场,搜索并安装 "Continue" 插件。
3.1 Continue 插件简介

Continue 是一个强大的 VS Code 插件,旨在将 AI 编程助手无缝集成到您的编程工作流程中[2]。它的主要特点包括:
- 支持多种 AI 模型,包括本地模型和云端服务。
- 提供代码补全、解释、重构和生成功能。
- 可以根据上下文理解您的代码和注释,提供更精准的建议。
- 支持自定义提示和工作流,以适应不同的编程需求。
- 具有隐私保护功能,可以在本地运行 AI 模型,保护您的代码安全。
3.2 Continue 插件安装
要在 Visual Studio Code 中安装 Continue 插件,请按照以下步骤操作:

- 打开 Visual Studio Code:启动您的 Visual Studio Code 编辑器。
- 访问扩展市场:在左侧活动栏中,点击扩展图标(通常是一个四方形的图标),或者使用快捷键
Ctrl+Shift+X。 - 搜索 Continue 插件:在扩展市场的搜索框中输入“Continue”,然后按回车键。
- 安装插件:在搜索结果中找到 Continue 插件,点击“安装”按钮。
- 配置插件:安装完成后,您可能需要根据需要进行一些配置。可以参考 Continue 的官方文档以获取详细的配置说明。
- 重启 VS Code:为了确保插件正常工作,建议重启 Visual Studio Code。
重启后使用快捷键 Cmd+L 打开对话框,建议将对话框拖动到右侧边栏:

在这里可以使用免费的测试账号,有 50 次使用 Claude Sonnet 3.5 大模型的机会。不过本文中我们主要讲怎么配置本地 Qwen2.5 Coder 模型。
通过这些步骤,您就可以成功在 Visual Studio Code 中安装 Continue 插件,开始使用它来增强您的开发体验。
3.3 Continue 插件配置 Ollama + Qwen2.5 Coder 模型
接下来,在
- 重命名变量
- 修改函数签名
- 调整代码逻辑
使用 Edit 功能
要使用 Edit 功能,您可以:
- 高亮您想要修改的代码块
- 按
Cmd + E(Mac)或Ctrl + E(Windows/Linux) - 在弹出的对话框中描述您想要进行的更改
系统会生成一个内联的差异(diff),您可以选择接受或拒绝这些更改。

4.4 代码生成
Continue.dev 还提供了代码生成功能,帮助您快速生成代码片段。您只需要描述您想要的功能,系统就会生成相应的代码。
使用代码生成功能
要使用代码生成功能,您可以:
- 在聊天窗口中输入您想要生成的代码描述
- 系统会根据您的描述生成代码片段
生成的代码可以直接插入到您的项目中,您可以根据需要进行修改。

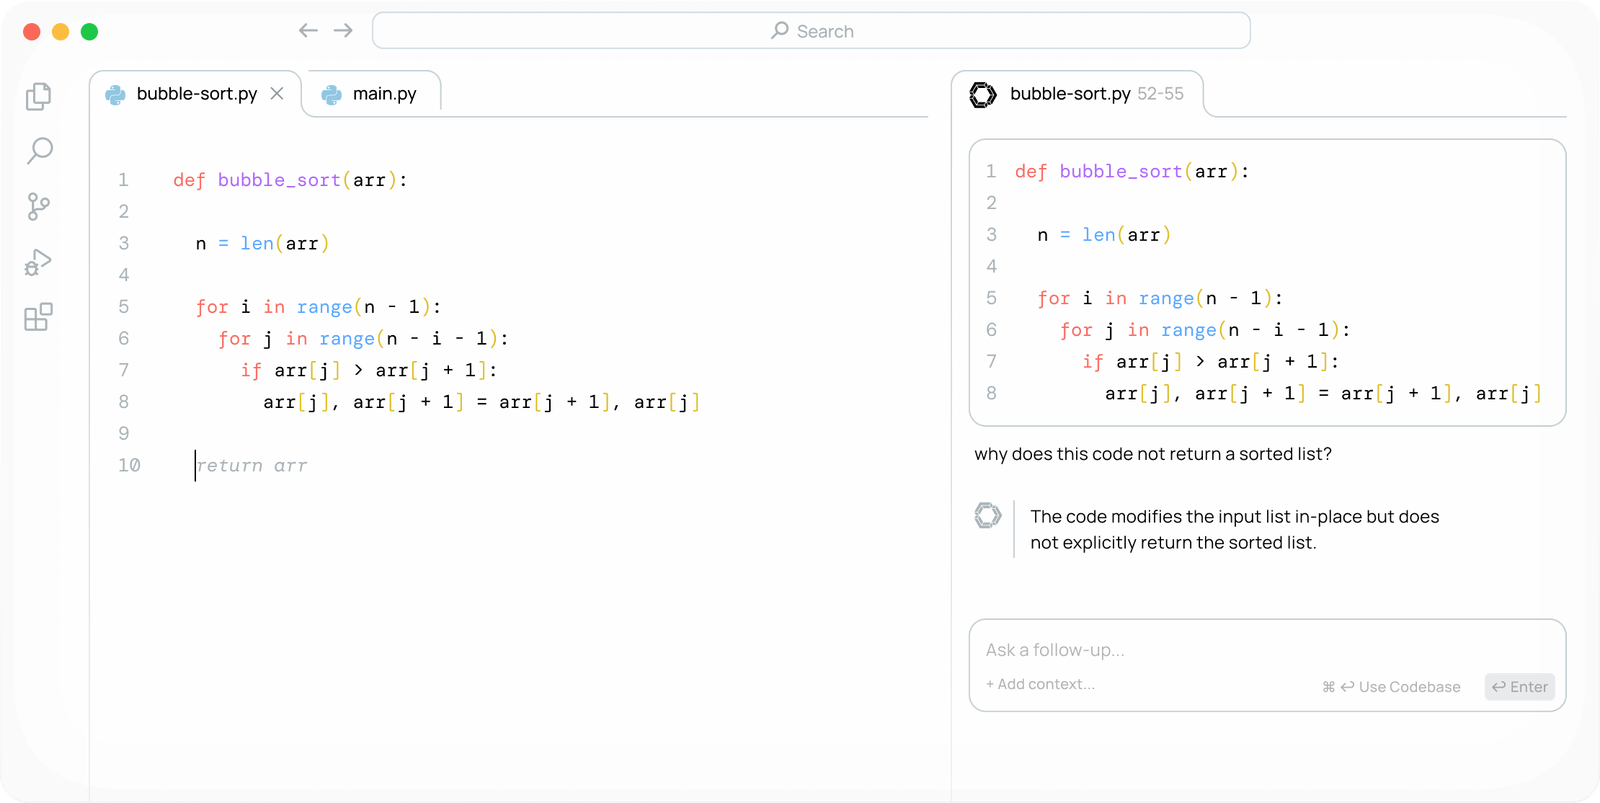
4.5 代码解释
Continue.dev 还可以帮助您解释代码。您只需要高亮一段代码,系统就会为您生成详细的解释,帮助您更好地理解代码的功能和逻辑。
使用代码解释功能
要使用代码解释功能,您可以:
- 高亮您想要解释的代码
- 按
Cmd + I(Mac)或Ctrl + I(Windows/Linux) - 系统会生成代码的详细解释

5. 总结
Continue 插件为开发者提供了强大的 AI 辅助编程功能,从聊天、自动补全、代码编辑到代码生成和解释,帮助开发者提高工作效率。通过合理配置和使用这些功能,您可以更轻松地完成编程任务。
Edit Feature Usage
The following are common operation steps:
-
Highlight code and activate the Edit feature
First, highlight the block of code you want to modify. Then, press
Cmd(Mac) orCtrl(Windows/Linux) +Ito activate the Edit input box. -
Describe code changes
In the input box, briefly describe the changes you want to make to the highlighted code. For the Edit feature, a good prompt should be relatively short and clear. If you need to perform a longer, more complex task, it is recommended to use the Chat feature.
-
Accept or reject changes
The system will generate inline differences within the text you highlighted. You can navigate and handle these suggested changes in the following ways:
- Accept a single change:
Cmd/Ctrl + Option + Y - Reject a single change:
Cmd/Ctrl + Option + N - Accept all changes:
Cmd/Ctrl + Shift + Enter - Reject all changes:
Cmd/Ctrl + Shift + Delete
If you want to request new suggestions for the same highlighted code, simply use
Cmd/Ctrl+Iagain to re-prompt the model. - Accept a single change:
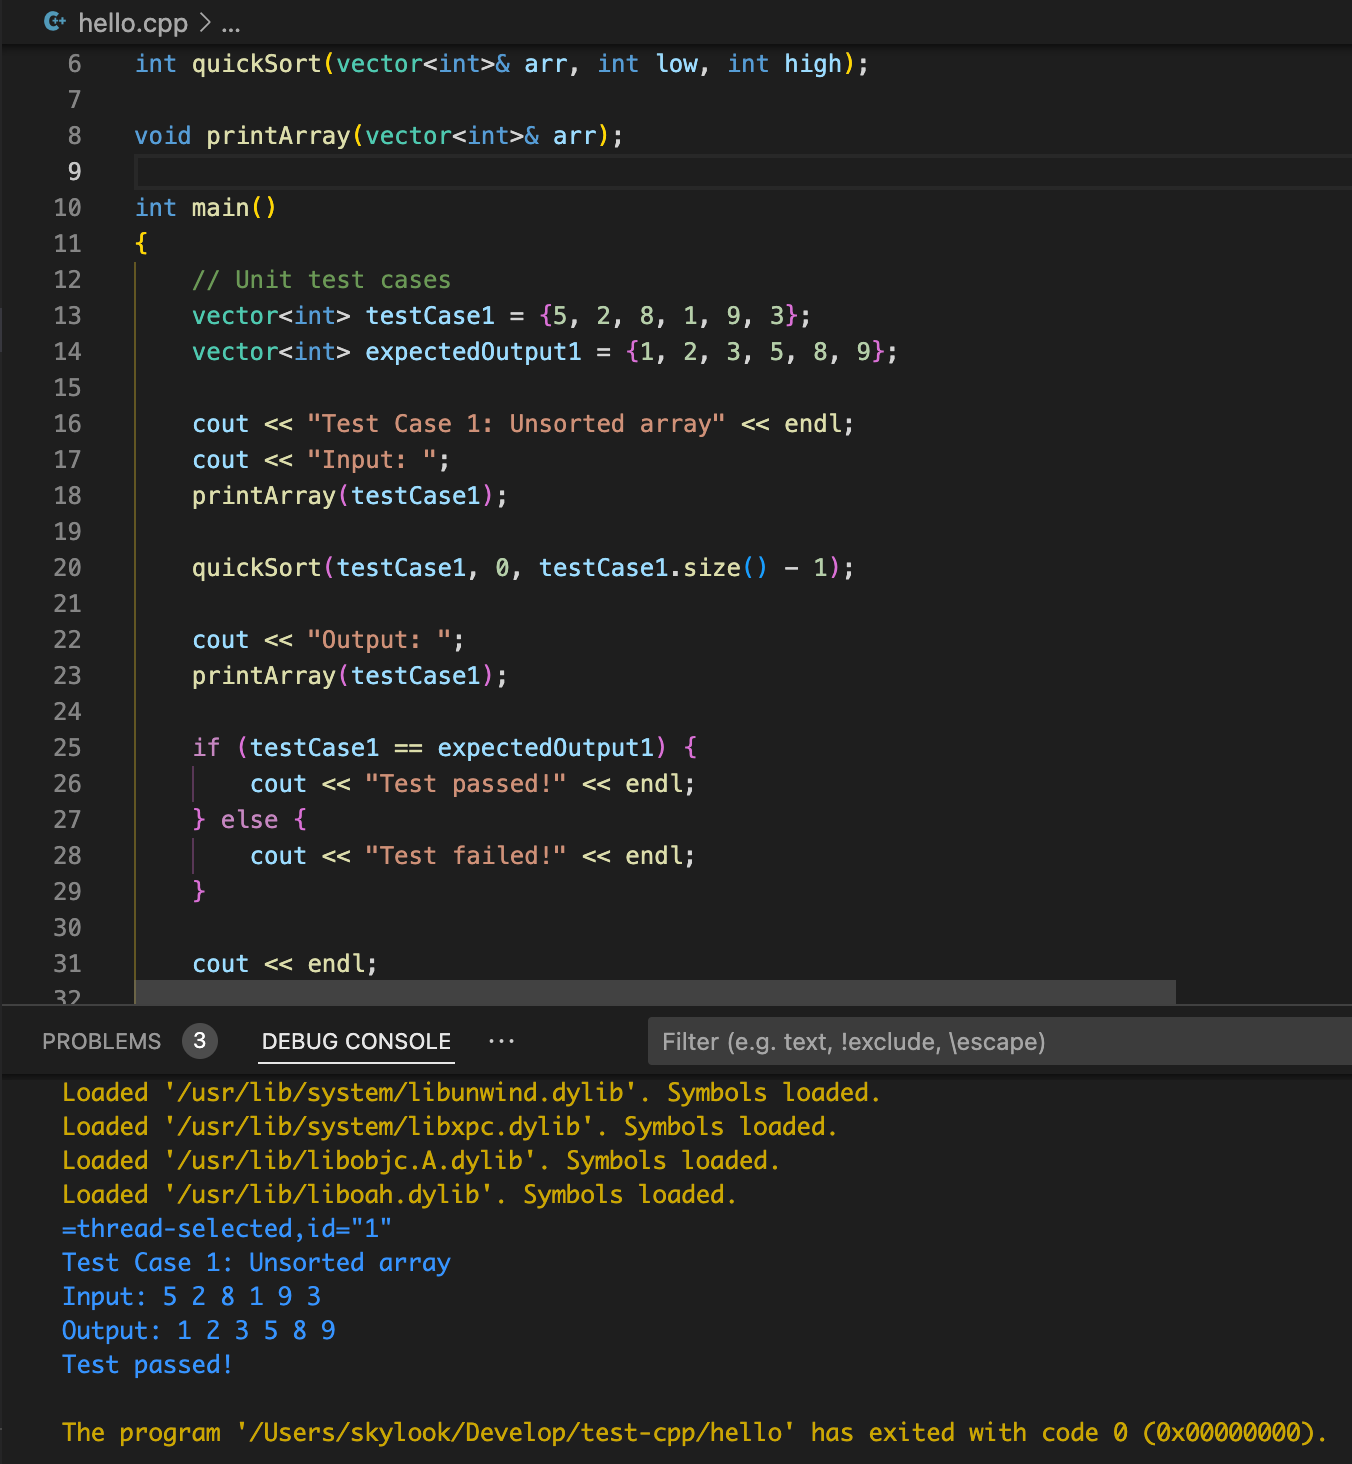
For example, to generate test code, we can highlight this code, then press Cmd + I and enter Generate Unit test in the dialog box.

After a short wait, a unit test code will be automatically generated (of course, this generation is relatively simple, and you can provide more prompts to help the model generate more complete code).
4.4 Actions Feature
The Action feature provides great convenience for developers. Action allows users to quickly execute predefined tasks, greatly improving coding efficiency.
The Continue plugin offers a variety of useful preset Actions, such as:
- Explain selected code
- Optimize code performance
- Add unit tests
- Fix errors in the code
Here are some commonly used Action features:
Slash Commands
For detailed reference:
https://docs.continue.dev/customize/slash-commands
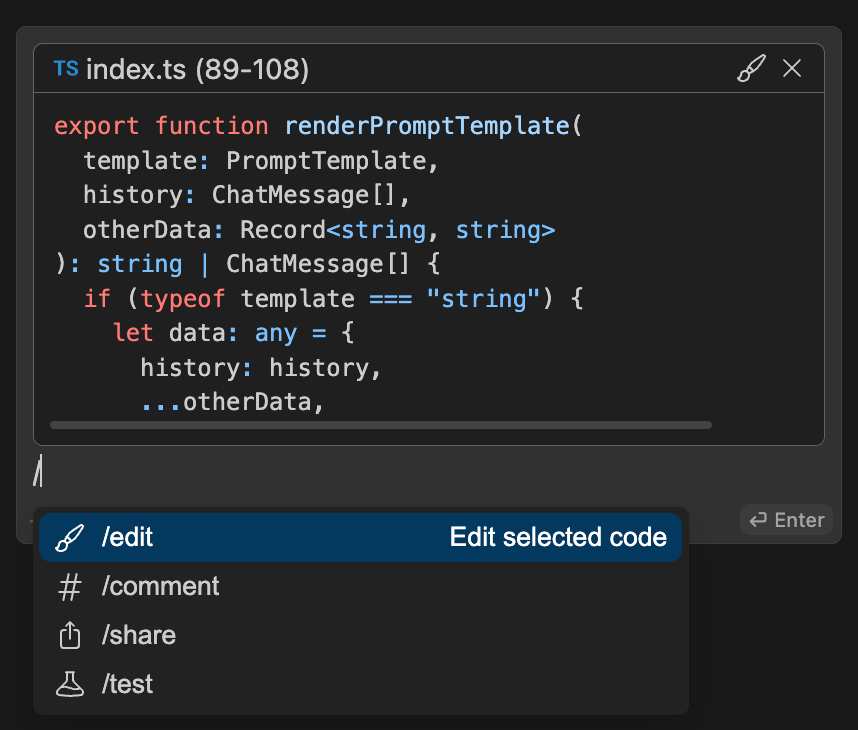
Some common command examples:
- Slash commands are activated by typing '/' and selecting from the dropdown menu.
- The
/editcommand allows users to stream code edits directly into the editor. - The
/commentcommand prompts the LLM to add comments to the highlighted code. - The
/sharecommand generates a shareable markdown text of the chat history. - The
/cmdcommand generates shell commands from natural language. - The
/commitcommand generates commit messages for current git changes. - The
/httpcommand allows you to create custom slash commands on your own HTTP endpoint. - The
/issuecommand helps generate a link to a GitHub draft issue. - The
/socommand references StackOverflow to answer questions. - The
/onboardcommand helps users get familiar with new projects.
Right-click Actions
Right-clicking allows you to highlight the desired code area, then right-click and select an action from the dropdown menu.
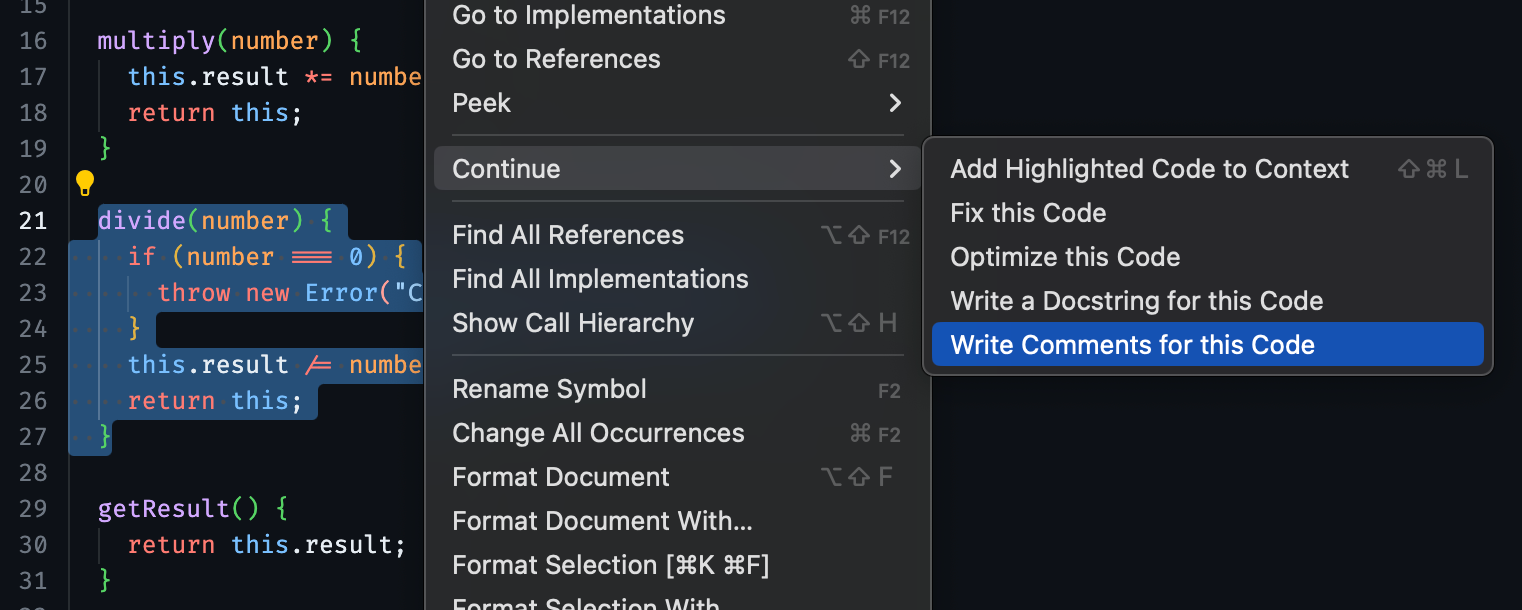
Continue provides the following common options:
- Add Highlighted Code to Context
- Fix this Code
- Optimize this Code
- Write a Docstring for this Code
- Write Comments for this Code
Here are some more detailed instructions:
https://docs.continue.dev/actions/how-to-use-it
Conclusion
After exploring these different features, we believe you now have a clearer understanding of how to best utilize Continue and Ollama. We hope these tools not only enhance your programming efficiency but also inspire your creativity, allowing you to continuously push your boundaries in the world of technology. Happy AI programming!
References
- QwenLM. (2024). Qwen2.5-Coder. GitHub. https://github.com/QwenLM/Qwen2.5-Coder
- Continue. (2024). Continue - AI Coding Assistant. https://www.continue.dev/
- Microsoft. (2024). Visual Studio Code. https://code.visualstudio.com/
- Ollama. (2024). Ollama: Get up and running with large language models locally. https://ollama.ai/
- Using local large models with Ollama and the Continue plugin in VSCode to achieve AI-assisted code writing. (2024). https://mp.weixin.qq.com/s/oqndOraEmIeFCpXT4QYOww
- Continue. (2024). OpenAI compatible servers / APIs. https://docs.continue.dev/customize/model-providers/openai#openai-compatible-servers--apis
- Continue. (2024). Ollama Code Assistant. https://blog.continue.dev/ollama-code-assistant/